")

2020/11/09

アザラシが大好きなエンジニアの開発日記です
今回は珍しく、Unityのエディタ拡張なお話です。
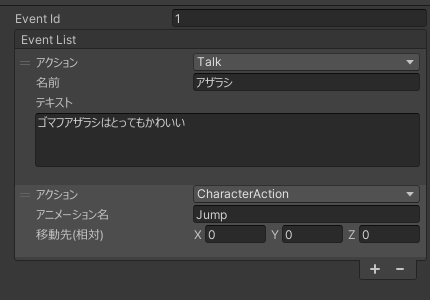
お題はインスペクターのカスタマイズで、作ったのはこちら!
この仕組みは自作ゲームの「ゲーム内の会話イベント」を実装するために作りました。
会話イベントにおいて「どんな順番で」「何をするのか」を設定可能にするため、「ReorderableListで」「列挙型に応じて入力項目が変わる」ScriptableObjectを作ってみました。
目次
http://49.233.81.186/reorderblelist.html
イベント全体を示すEventDataクラスと、イベント内の1アクションを示すEventActionDataクラスを作成します。
EventDataはScriptableObjectを継承します。EventActionDataはDTOのようなものなので、何も継承しないシンプルなクラスです。
using System;
using System.Collections.Generic;
using UnityEngine;

[Serializable]
[CreateAssetMenu(menuName = "ScriptableObject/EventData")]
public class EventData : ScriptableObject
{
    public int eventId;
    public List<EventActionData> actionList;
}

[Serializable]
public class EventActionData
{
    public EventActionType actionType;
    public string talkName;
    [TextArea]
    public string talkText;
    public Vector3 localMovePoint;
    public string animationName;
}
アクション種別として列挙型も作成しておきます。
public enum EventActionType
{
    Talk,
    CharacterAction
}
次にEventDataのインスペクターをカスタマイズするクラスを作成します。
このスクリプトはAsset内の任意のEditorフォルダに保存する必要があります。他のスクリプトと同じディレクトリ内に配置しないように注意します。
using UnityEditor;
using UnityEditorInternal;

/// <summary>
/// イベントデータのinspectorを拡張するEditorクラス
/// </summary>
[CustomEditor(typeof(EventData))]
public class EventDataEditor : Editor
{
    private ReorderableList reorderableList;
    private SerializedProperty actionDataList;

    private void OnEnable()
    {
        actionDataList = serializedObject.FindProperty("actionList");

        reorderableList = new ReorderableList(serializedObject, actionDataList);
        reorderableList.drawElementCallback = (rect, index, active, focused) => {
            var actionData = actionDataList.GetArrayElementAtIndex(index);
            EditorGUI.PropertyField(rect, actionData);
        };
        reorderableList.drawHeaderCallback = (rect) => EditorGUI.LabelField(rect, "Event List");
        reorderableList.elementHeightCallback = index => EditorGUI.GetPropertyHeight(actionDataList.GetArrayElementAtIndex(index));
    }

    public override void OnInspectorGUI()
    {
        var eventId = serializedObject.FindProperty("eventId");
        EditorGUILayout.PropertyField(eventId);

        serializedObject.Update();
        reorderableList.DoLayoutList();
        serializedObject.ApplyModifiedProperties();
    }
}
イベントアクションの表示は後述するPropertyDrawerで行うので、こちらではdrawElementCallback内でEditorGUI.PropertyField()を呼び出すだけです。
ポイントはreorderableList.elementHeightCallbackの指定です。
可変する要素数に応じた高さに設定しなければならないので、固定値での指定はNGです。GetArrayElementAtIndex()で要素に合わせた高さを取得します。
その「要素に合わせた高さ」はPropertyDrawerのGetPropertyHeight()で指定しています。
最後はEventData.actionListで定義しているEventActionDataのリストの、1要素あたりの表示をカスタマイズするクラスです。
こちらもEditorフォルダ内に作成しましょう。
using System;
using UnityEditor;
using UnityEngine;

/// <summary>
/// イベントデータの各要素のinspector表示をカスタマイズするためのDrawerクラス
/// </summary>
[CustomPropertyDrawer(typeof(EventActionData))]
public class EventActionDataDrawer : PropertyDrawer
{
    public override void OnGUI(Rect position, SerializedProperty property, GUIContent label)
    {
        // List用に1つのプロパティであることを示すためPropertyScopeで囲む
        using (new EditorGUI.PropertyScope(position, label, property)) {
            // 0指定だとReorderableListのドラッグと被るのでLineHeightを指定
            position.height = EditorGUIUtility.singleLineHeight;

            var actionTypeRect = new Rect(position) {
                y = position.y
            };

            var actionTypeProperty = property.FindPropertyRelative("actionType");
            actionTypeProperty.enumValueIndex = EditorGUI.Popup(actionTypeRect, "アクション", actionTypeProperty.enumValueIndex, Enum.GetNames(typeof(EventActionType)));

            switch ((EventActionType)actionTypeProperty.enumValueIndex) {
                case EventActionType.Talk:
                    var talkNameRect = new Rect(actionTypeRect) {
                        y = actionTypeRect.y + EditorGUIUtility.singleLineHeight + 2f
                    };
                    var talkNameProperty = property.FindPropertyRelative("talkName");
                    talkNameProperty.stringValue = EditorGUI.TextField(talkNameRect, "名前", talkNameProperty.stringValue);

                    var talkTextLabelRect = new Rect(talkNameRect) {
                        y = talkNameRect.y + EditorGUIUtility.singleLineHeight + 2f
                    };
                    EditorGUI.LabelField(talkTextLabelRect, "テキスト");

                    var talkTextRect = new Rect(talkTextLabelRect) {
                        // TextAreaなので3行分確保
                        y = talkTextLabelRect.y + EditorGUIUtility.singleLineHeight + 2f,
                        height = (EditorGUIUtility.singleLineHeight * 3)
                    };
                    var talkTextProperty = property.FindPropertyRelative("talkText");
                    talkTextProperty.stringValue = EditorGUI.TextArea(talkTextRect, talkTextProperty.stringValue);

                    break;
                case EventActionType.CharacterAction:
                    var animationNameRect = new Rect(actionTypeRect) {
                        y = actionTypeRect.y + EditorGUIUtility.singleLineHeight + 2f
                    };
                    var animationNameProperty = property.FindPropertyRelative("talkName");
                    animationNameProperty.stringValue = EditorGUI.TextField(animationNameRect, "アニメーション名", animationNameProperty.stringValue);

                    var localMovePointRect = new Rect(animationNameRect) {
                        y = animationNameRect.y + EditorGUIUtility.singleLineHeight + 2f
                    };
                    var localMovePointProperty = property.FindPropertyRelative("localMovePoint");
                    localMovePointProperty.vector3Value = EditorGUI.Vector3Field(localMovePointRect, "移動先(相対)", localMovePointProperty.vector3Value);

                    break;
            }
        }
    }

    public override float GetPropertyHeight(SerializedProperty property, GUIContent label)
    {
        var height = EditorGUIUtility.singleLineHeight;

        var actionTypeProperty = property.FindPropertyRelative("actionType");
        switch ((EventActionType)actionTypeProperty.enumValueIndex) {
            case EventActionType.Talk:
                height = 130f;
                break;
            case EventActionType.CharacterAction:
                height = 70f;
                break;
        }

        return height;
    }
}
ポイントはactionTypePropertyに応じてswitchで処理を分岐し、各々で必要なGUIを追加していることです。
分岐さえしてしまえば、あとは「Rectで表示領域を確保→EditorGUIで入力項目を追加」を繰り返せばOKです。
また、EventDataEditorであった「要素に合わせた高さ」取得のため、GetPropertyHeight()をオーバーライドしています。
中身は現在のactionTypeの値を取って分岐させるだけです。要素数を変える場合はそれに応じて値を調整してください。もし要素に配列等がある場合、SerializedPropertyのarraySizeを掛けて高さを確保すると良いです。
最終的にこんな感じの表示になります。リスト内の要素の入力項目がEventActionTypeに応じて変わっていますね。
ということで、エディタ拡張で可変式のリストを作ってみました。
インスペクターのエディタ拡張に挑戦したのは何気に初めてだったりします。なかなか便利なので使える機会があれば使っていきたいですね。
特に共同開発等で他の人もUnityを触る場合、うまく使えば円滑に作業が進められそうです。
more

2017/10/01

2016/11/19

2016/06/23
more

2024/05/14

2024/05/05
more
」に参加しました!")
2020/05/24
」に参加しました!")
2020/03/15

2019/06/23
more

2020/10/20

2020/01/28

2020/01/10


治るまでの体験談と治ったきっかけについて考えたこと")